Real Weird Blog
A fun blog about real life and the real weird things we encounter.

Hi visitors! I am so happy to have you here. Please have a look around and let me know what you like or don't like :/ Leave a comment or send me an email! I love to hear from my readers.

Elf on the Shelf: Day 12, 13, 14, 15, and 16!


Clearly I have been a little behind with the Elf updates. Here are the last 5 days of fun!


Day 12:  Sparkly decorated our tree with a bunch of BUGS!! My 2 year old decided immediately that this was NOT the place for the bugs and took them off the tree. 


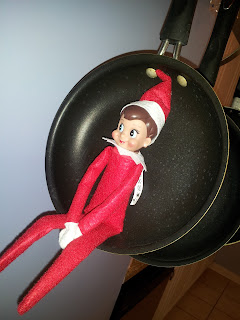
 Day 13: Sparkly is hanging out in this super water spot pot. (Anyone have any suggestions to avoid water spots?)
   
Day 14: Our elf had planed a fun event! There was a path leading to a gingerbread house in another room, which we made later that day. To make the foot prints just draw a foot shape on a piece of cardboard and trace it onto some white wrapping paper. Cut out all 1 million of the feet. Put a piece of double sided stick tape to the feet. Make sure to have the feet facing out. This most certainly is not a quick Elf activity but it is fun for the whole family!


We opted for the, "Who gives a fuck what our ginger bread house looks like?" look.


My daughter had lots of fun adding the candy everywhere on the house. 


My husband would like everyone to know that the house DOES NOT taste good! We even got him to add on some decorations.


Day 15: Just playing some Clouds and Sheep on my daughters tablet. 


Day 16: Hanging out in Daddy's boot.

Go here to view all of the other Elf on the Shelf activities we have done this year!

Anyone else out there participating in this fun yet creepy tradition that is sweeping the nation? Leave your ideas in the comments and be sure to check back frequently as I will be posting all of our Elf activities right here.


Cake Pops Tutorial!


When I first tried the Cake pops by Starbucks I Fell. In. Love. However, I thought that they were a bit pricey. I started looking for more affordable ways to make them myself. I came across the Oreo pops and have made those for several events. Everyone who tried them enjoyed them and I won a baking competition at work! I still wanted to learn how to make cake pops.

I tried a no bake option with tons of powdered sugar and they were horrible. When I made my Halloween cupcakes I had some extra cake. I decided to try and create my own recipe with a few other random ingredients. These were a huge success! I found that even I liked them better than the Starbucks cake pops.
Recently a friend and her son celebrated his 18th birthday and requested that I make these cake pops for them. Even better than that, she was helping! So I decided this would be the PERFECT time to put together a tutorial.

INGREDIENTS
Cake!
1/2 cup of Powdered Sugar
2 Bags Wilton Chocolate Melts
Sitcks (Optional)
1 8oz pack of Cream Cheese
Wax or Parchment Paper
*Makes about 25 Cake Pops*


DIRECTIONS

1. Make your cake just like your box says. (Betty Crocker Super Moist has been my favorite. Maybe one day I will search for a from scratch recipe :\) Let the cake cool before going to the next step. Trust me you don't want to be crumbling up hot cake. :)


2. Crumble the cake. I use a fork and sort of scrape across the cake. Don't worry if there are a few larger pieces  you'll take care of those in a moment.


3. Add the powder sugar and the cream cheese. I like to use about 6oz to 7oz of cream cheese but if you overcooked your cake you can use more. Mix this all together you should be able to pick up the whole chunk without pieces falling off. Or at least mostly.


4. Roll the dough into little or big balls (your choice!) Using an ice cream or cookie scoop may help make your size consistent. Place the balls on some parchment or wax paper and on a cookie sheet.

5. Pop the balls in the fridge for about 15 min.


6. Heat about 7 to 10 of the melts in a small dish according to the directions on the package. Use this to dip your sticks in before shoving the stick into the frozenish cake. This will help the ball stay on the stick. *For your sticks you can use the super expensive white ones or you can get some cheap bamboo skewers and cut them in half.* Put the balls back in the freezer for another 10 min or until the chocolate is hard.
*I like to use Wilton Candy Melts but there are a few other brands out there.*

7. Heat the rest of the chocolate in a narrow bowl or measuring cup. Dip the balls into the chocolate and place back on the pan or in a stand (you can use a store bought one, styrofoam, or card board). You can tap the stick on the edge of the bowl to get some of the excess chocolate off. This is the time when you would want to put the decoration on. The chocolate hardens pretty quickly. Keep in the fridge until about 20 min before serving. I prefer them to be a bit colder but you could leave them out a bit longer and they would still taste fine. 


Have you made cake pops? Do you have any tips? Share them in the comments!


Elf on the Shelf: Day 9, 10, and 11


Day 9: Sparkly :) took all of my daughter's books out and threw them on the floor. 


Day 10: She decided to take a ride on my daughter's old rocking horse. Because we have a 2 year old and it is likely this elf will get knocked over, we have an agreement that only mommy can move the elf. My 2 year old has been doing great with this. If Sparkly falls over or needs to be moved to another location for the rest of the day, Zoey understands that it is ok for mommy to move the elf without it loosing its magic. She has not touched the elf a single time. I think I will tell her that everything will loose its magic if she touches it!


Day 11:  I even tried to build in some father daughter time. On Day 11 Sparkly gave a gift of a gingerbread necklace. Since I am at work today they will have to put it together. Having Sparkly give a gift or a craft is great for those days when I forget to do something or don't have time.

Go here to view all of the other Elf on the Shelf ideas I have used this year!

Anyone else out there participating in this fun yet creepy tradition that is sweeping the nation? Leave your ideas in the comments and be sure to check back frequently as I will be posting all of our Elf activities right here.


Chocolate Trees! YUM!


On Thanksgiving I had some extra chocolate left over from my cake pops (tutorial coming soon!) I had been wanting to pipe out some little designs and I think these came out well.

To do this all you need is to put some chocolate in a piping bottle/bag or use a ziploc bag and snip the corner off. Pipe out your design. I did the outline first, made it kind of thick and then I piped the zig-zags across. I added some sprinkles to finish it off. These can be used for your ginger bread houses, to add to cupcakes or cakes, or even just as a cute holiday snack.


We have been working on many holiday projects this year. I plan on posting them all for everyone to see. What kind of holiday projects have you been working on? Share your ideas in the comments! You can even add a link to your Pinterest boards.